IP Access Lists
ACCESS LISTS
Access lists allow Cisco routers to function as a packet filter and are supported for several protocols. The most common of these protocols are listed in the following table:
Protocol Range
IP standard 1 to 99 (and 1300 to 1999 in IOS 12.0 and higher)
IP Extended 100-199 (and 2000 to 2699 in IOS 12.0 and higher)
Ethernet type code 200-299
DecNet 300-399
XNS 400-499
Extended XNS 500-599
AppleTalk 600-699
Ethernet address 700-799
IPX Standard 800-899
IPX Extended 900-999
IPX SAP 1000-1099
Access lists are lists of rules that either permit or deny certain inbound or outbound traffic from and to particular hosts or networks. The access list and its rules are applied to one or more interfaces on the router. When the router routes traffic through these interfaces, the rules in the list are processed sequential, looking for a matching rule permitting the traffic to pass. When there is not a matching rule permitting the traffic to pass, it is denied by default because of the implicit deny any at the end of each rule. For example, if you deny telnet traffic to host 172.16.22.139 using the rule: access-list 110 deny TCP any host 172.16.22.139 eq TELNET and this would be the only rule in the access list, you would effectively deny all IP traffic from entering or leaving the router’s interface.
The implicit deny all, for many, is a confusing part of access lists and often forgotten in practice while in fact it is very logical. If you want to protect a network using a packet filter, you would typically start out with denying all traffic, and from there permit certain hosts or networks to communicate certain traffic.
In addition to protecting private networks from external intruders, access lists are also commonly used to manage network traffic. For example, if you do not want certain protocols or services available in particular subnets you can block only those ports but permit all other traffic. This is also used as an effective way to prevent traffic such as ICMP messages and routing updates from traveling over certain links.
Standard IP Access Lists
Standard IP access lists are used to permit/deny traffic from or to one or more IP addresses.
Use the global exec access-list command to create access lists:
router(config)#access-list number deny|permit source|any [log]
Use the Interface config mode access-group command to bind the access list to an interface: router(config-if)#ip access-group number in|out
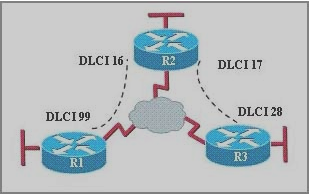
For example, to deny hostC from sending traffic to the WAN in the network depicted in the diagram below, use the following commands.
router(config)#access-list 10 deny 192.168.23.11 router(config)#access-list 10 permit any router(config)#interface ethernet 0 router(config-if)#ip access-group 10 in

When traffic is send to the router’s Ethernet interface the rules in access list 10 are processed, if the traffic is send by hostC the router drops the packets and stops processing the rules. The rule access-list 10 permit any is included because of the implicit deny. There must be at least one ‘permit’ rule otherwise the protocol is completely disabled for the interface as soon as you bind it.
Wildcard Masks/Inverse Masks
Instead of specifying a single IP address, you can also permit or deny networks/subnets entirely or partly by using wildcard masks, also known as inverse masks. To understand this concept, it helps a lot if you have some basic understanding of subnetting.
The first example is simple: if you want to deny access to all hosts in the network 172.16.23.0 with subnet mask 255.255.255.0 you would use 172.168.23.0 0.0.0.255 as the source in the access-list command. When the router checks if the addressing information of an incoming packet matches the denied address specified in the access list, it only cares about the part of the address where the corresponding bits in the inverse mask are 0. The part of the address where the corresponding bits in the inverse mask are set to 1 can be anything (in this example 0 to 255).
In other situations, where you want to specify a range of addresses that does not have the boundary between 0s and 1s exactly between octets, you might need to convert it all to binary to determine the inverse mask. For example, you want to specify the network 172.18.16.0 with the subnet mask 255.255.240.0. When you convert this mask to binary it shows that in this subnet mask the first 20 bits are set to 1 (11111111.11111111.11110000.00000000), so the inverse mask would have the first 20 bits set to 00000000.00000000.00001111.11111111 which is 0.0.15.255 in decimal notation. This would specify the address range 172.18.16.0 to 172.18.31.255.
If you want the source or destination to be any host from any network you could use the address 0.0.0.0 with the inverse mask 255.255.255.255, but to save you from pressing so much keys you can use the keyword any instead.
In Extended Access lists the keyword host can be used to replace the 0.0.0.0 inverse mask. Instead of specifying a single address with 192.168.23.11 0.0.0.0 you can use host 192.168.23.11.
Extended IP Access Lists
Extended IP access lists offer more granular control compared to standard lists that only allow you to deny or permit traffic from a certain source. Extended access lists allow you to control TCP/IP traffic based on the Transport protocol being used (TCP or UDP) and the service or application (e.g. SMTP, Telnet) from source addresses AND destination addresses.
Use the global exec access-list command to create the access lists. This command supports numerous arguments, most of them are beyond the scope of the CCNA exam. At the bottom of this TechNote are links to documents at Cisco.com explaining the complete syntax. Nevertheless, here is the most important part:
router(config)#access-list number deny|permit protocol source|any destination|any
When TCP or UDP is used as the protocol argument two other important arguments are operator port. The port argument can be a TCP or UDP port number or name (e.g. 21 or FTP, 23 or TELNET, 123 or NTP), the operator is usually eq which means equal, other options include lt (less than) and gt (greater than).
Use the Interface config mode access-group command to apply the access list to an interface: router(config-if)#ip access-group number in|out
Take a look at the diagram below for example:

You can prevent SMTP traffic originating from the WANs from traveling over link A to an SMTP server wuth destination 192.168.115.20 by putting an outbound extended IP access list on the Serial 0 interface of RouterX and using the following commands on RouterX (or RouterY):
router(config)#access-list 105 deny TCP any host 192.168.115.20 eq SMTP
router(config)#access-list 105 permit IP any any
router(config)#interface serial 0
router(config-if)#ip access-group 105 out
Following is another example using the same diagram above. It shows how you can use extended access lists to control ICMP traffic (used for utilities such as ping and trace). For example, to deny the hosts in the Ethernet network attached to RouterY to use ICMP to communicate with hosts on the other side of the router, use the following commands on RouterY:
router(config)#access-list 102 deny icmp 192.168.115.0 0.0.0.255 any
router(config)#access-list 102 permit IP any any
router(config)#interface serial 1
router(config-if)#ip access-group 102 out
The following command allows you to remove an access list from interface:
router(config-if)#no ip access-group number|name in|out
For example: router(config-if)#no ip access-group 102 out
The following commands allows you to completely delete an access list from the configuration:
router(config)#no access-list number|name
For example: router(config)#no access-list 102
Named Access Lists
If your router is running IOS 11.2 or higher, you can create named access lists. Instead of choosing a number between 1-99 for standard IP access lists, you can use a custom name allowing for more lists and more convenient management. The commands to create a named access list are different for standard and extended access lists.
To create a named access list, use the following command in global configuration mode:
router(config)#ip access-list {standard | extended} name
This command will take you into access-list configuration mode where you can define the deny and permit rules. For example to create a named access list with the name wwwfilter and permit only access from the networks 192.168.132.0, 172.17.0.0 and 10.0.0.0 use the following commands:
router(config)#ip access-list standard wwwfilter
router(config-std-nacl)#permit 192.168.132.0 0.0.0.255
router(config-std-nacl)#permit 172.17.0.0 0.0.255.255
router(config-std-nacl)#permit 10.0.0.0 0.255.255.255
Use the exit command to exit access-list configuration mode.
A named list is applied to an interface in the same way as with numbered lists:
router(config-if)#ip access-group wwwfilter out
VTY Lines
You can also use standard access lists to limit access to VTY lines. For example:
router(config)#access-list 5 permit 192.168.23.8
router(config)#line vty 0 4
router(config)#access-class 5 in
Monitoring and Verifying
The following commands are useful for monitoring and verifying the operation of access lists.
The show ip interface command displays which access lists are applied to the specified interface, for example:
router(config)#show ip interface serial 1
The following command displays the contents of an access list, and if applied to an interface, the number of matches per permit/deny rule:
router(config)#show access-lists number|name
If you do not specify an access-list number or name, all the current access lists will be displayed. You can also use the show ip access-lists command to display one or all of the current IP access lists.