GNS3 Configuration Guide
What is GNS3 I hear you cry? Well, imho, it is the best tool on the market to practice router configuration without having an actual router in front of you. What sets it apart is that it is a Cisco IOS emulator, not one of those nasty simulators that constrain the commands that can be used. The caveat is that you will need a Cisco IOS, for example I use the 3660 Crypto IOS. I have a support contract with Cisco so I can access an IOS however if you look around enough you will be able to find a Cisco IOS for yourself.
GNS3 is actually the graphical front-end of Dynamips/Dynagen and allows you to drag-and-drop routers onto a stage, connect them up, run IOS on them, and save their configs, just as if you had your own network. It can be a little confusing to set up first of all so I will present a step-by-step guide below of how to install and configure GNS3 including a couple of advanced options which will allow you to run Cisco Security Device Manager (SDM) on your PC
Installation and Configuration
This process needs to be done only the once.
1. Download GNS3 from here and choose the installer which includes Dynamips, WinPCap and the binary version of GNS3 and install, accepting the various licence agreements etc.
2. You now need a Cisco IOS. Get one from Cisco if you have a CCO account with Support or find an IOS on Google.
3. Now open up GNS3.
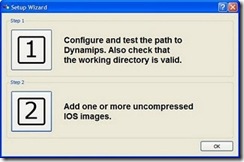
Users of GNS3 version 0.5 will see the following:

4. Now click on Step 1.
You will see something similar to the following:

5. The executable path should point to the dynamips-wxp.exe in the Program Files directory. Change the Working Directory to a desired folder then click on the Test button. You should see that Dynamips has successfully started, if so click Apply then OK. If not you should double-check the Executable Path and the Working Directory:
![]()
6. Go back to the Setup Wizard and choose Step 2 and you should get a screen similar to below:

7. In the Settings section you need to point to the IOS image you copied in Step 2 and select the platform and model, then click on Save. The value of the IDLE PC section will be blank and leave blank for now. Now click on Close. Click on OK to close the Setup Wizard.
8. On the main screen drag a router onto the main screen then right-click on it, select Start and wait for the IOS to start and then right-click and select Console. You should now get a DOS screen open up with a telnet session for the router. NOTE: The length of time you have to wait for this to start depends on the speed and memory of your PC.

9. Say “No” to initial configuration dialog until you get to the Router> prompt. Now type enable to go into Enable mode.
10. Go back to the GNS3 session KEEPING THE CONSOLE SESSION OPEN.
11. Type idlepc get your-router-name for example idlepc get R0 and wait for some idlepc values to be displayed. Make a note of these values and click Cancel.

12. By default Dynamips will take up 100% of your CPU usage and you need to specify an idlepc value to get that changed. Close down the console session and open up Task Manager on your PC (usually CTRL-ALT-DELETE) then go to the Performance tab.

13. Go to Edit–>IOS Images and Hypervisors and select the IOS you identified in Step 4 then click on Edit. Enter the first idlepc value you wrote down from Step 12 then click on Save then Close.
14. Start the IOS again as you did in Step 8 then console to the router. View the CPU utilisation in Task Manager and see if it falls below 5%. If it stays at 100% then go back to step 14 and change the idlepc value to the next one in the list. Repeat this until you get an idlepc value that has the CPU utilisation at around 5% or less.
You have now successfully installed and configured GNS3.
Configuring a Serial Interface on a Router
By default the 3660 image that I use comes with 2 FastEthernet interfaces. In order to simulate WAN links you need to add serial interfaces to the router as outlined below.
1. Right-click on your router, choose Configure, then click on your router name.
2. Click on the slots tab and change slot 1 (or any other slot other than slot 0) to NM-4T. This will provide you with 4 serial interfaces. NOTE THAT THE SLOT NAME MAY BE DIFFERENT DEPENDING ON WHICH IOS YOU USE.

3. Click on Apply then OK.
Adding a switch module to your router
Follow the same steps as you did for configuring a serial interface but choose the NM-16ESW module from the drop-down list.
Connecting two or more routers
You will come to the point where configuring just one router is not sufficient such as when you want to run a routing protocol. The following guidelines show you how to connect routers together.
1. Drag two or more routers onto the stage and configure their slots if required. Display their hostnames by pressing the ABC button on the toolbar if they are not already displayed.
![]()
This is a personal preference and allows you to track which router is which.
2. Now click on the interface button on the toolbar and select Manual.
![]()
The interface button changes to a red cross.
![]()
Now left-click on a router and select an interface which you want a cable connected to. Now click the router to which you want to connect to and select the interface on that router for the other end of the link. You should now see the link has been drawn. Once you have finished configuring the interfaces click the interface button (red cross) to get out of interface configuration mode (the icon will revert to the telephone jack symbol). The picture below shows three routers with a FastEthernet connection and the other with a Serial link (zig-zag line).

3. Notice that each link has got a red dot on it. When you start the IOS each dot should turn to green which denotes that each router has successfully started the IOS.
Saving your configuration
After all your hard work on the command line you will probably want to save your configuration and reuse it on another day. Follow the steps below to save your work:
1. Go to File–>Save As and save your topology where you want as a .net file. When it comes to reusing this topology just double-click on the .net file to open it up in GNS3.
2. On each router save your config using copy run start
3. Back in GNS3 type save /all in the bottom half of the screen to save all of the configs into the .net file. If you want to save the config of only one router you can replace the keyword all with the name of the router you wish to save the config of. You can also extract the configs by clicking on the "Extract all start-up configs" button on the toolbar.
![]()
Configuring a host in the network (Advanced)
There may be an occasion when you want to connect a host in your topology such as running Cisco’s Security Device Manager (use of this may figure in future CCNA exams). To do this you must first configure a Loopback Adapter on your PC.
1. Go to Control Panel–>Add Hardware then click Next
2. Yes I have already connected the hardware
3. Scroll to the bottom and click on Add a new hardware device then Next
4. Install the hardware that I manually select from a list (Advanced)
5. Click on Network Adapters then Next
6. Select Microsoft as the Manufacturer then on Microsoft Loopback Adapter under Network Adapter then click Next then Next again.
7. Open up Control Panel–>Network Connections to see the adapter in place.
Now that you have created a loopback adapter you will want to connect it to a router. To do this, follow these steps:
1. In the GNS3 installation directory run the Network Device List.bat file which will give you the Ethernet address of your Loopback Adapter.

Notice the second adapter shown where description is MS Loopback Driver. I have renamed the adapter as Loopback Adapter for SDM. We are interested in the NIO_gen_eth string.
2. Go into GNS3 and drag a cloud onto the stage.
3. Right-click the cloud and select configure.
4. Choose your cloud from the list.
5. In the Generic Ethernet NIO section select your Loopback Adapter from the drop-down list (the one that matches what is shown in Step 1) and click on Add, Apply, the OK.

6. Now connect a FastEthernet port on your router to the cloud as you would connect two routers.
7. Configure an IP address and subnet mask on the router interface connected to the cloud and bring the interface up.
8. Go to Control Panel–>Network Connections and right-click your adapter. Choose Properties then Internet Protocol (TCP/IP) and give it an IP address in the same subnet as the router’s FastEthernet interface with the same subnet mask and with a default gateway matching the IP address of the router’s interface.
Example:
Router’s FastEthernet 0/0 interface connected to the cloud:
On the router I would have something like:
Router(config)#int fa0/0
Router(config-if)#ip address 192.168.1.1 255.255.255.0
Router(config-if)#no shut
On the PC I would have something like:
IP address = 192.168.1.2
Subnet Mask = 255.255.255.0
Default Gateway = 192.168.1.1
You should now be able to ping between your PC and the router
Running SDM (Advanced)
There may be a need to practice using the Cisco Security Device Manager (SDM) for your exam and the following steps show you how to configure it.
1. Download and install SDM from the www.cisco.com or from a share on the web.
2. Choose to only install SDM to your PC, NOT to the router.
3. Now configure your router with a hostname and a domain name in order for SSH to work:
Router#conf t
Router(config)#hostname SDMRouter
SDMRouter(config)#ip domain-name SDMDomain
4. Now configure your router with the following commands:
SDMRouter(config)#username your_username privilege 15 secret 5
SDMRouter(config)#ip https server
SDMRouter(config)#ip https secure-server
SDMRouter(config)#ip https authentication local
SDMRouter(config)#line vty 0 4
SDMRouter(config-line)#login local
SDMRouter(config-line)#transport input telnet ssh
SDMRouter(config-line)#privilege level 15
SDMRouter(config-line)#line cons 0
SDMRouter(config-line)#login local
SDMRouter(config-line)#transport input telnet ssh
SDMRouter(config-line)#privilege level 15
SDMRouter(config-line)#exit
SDMRouter(config)#crypto key generate rsa gen mod 1024
5. Now double-click the SDM icon and enter the IP address of the router and tick the box asking about httpsS then click on Launch.

6. Ensure you allow popups on your browser.
7. Enter username and password as defined after step 3.
8. Say yes to allow SDM to install.
You should now have a screen similar to the one below although this may be because I used a username and password of “cisco” which are the default.

9. Select a new username and password for the router then click OK. You should see the screen below then click OK.

10. You should now be in SDM and able to configure the router.